https://kipalog.com/posts/Su-dung-Fragment-trong-Android
1. Fragment là gì ?... Một số khái niệm cơ bản
- Trong các ứng dụng android, tại một thời điểm, chỉ có một Activity được hiển thị duy nhất trên màn hình. Chúng ta muốn chia màn hình ra nhiều phần để dễ sử dụng thì fragment đáp ứng điều đó
- Fragment là một thành phần android độc lập, được sử dụng bởi một activity, giống như một sub-activity. Fragment có vòng đời và giao diện riêng. Các Fragment thường có một file java đi kèm với file giao diện xml. Các fragment không có file giao diện xml thường được gọi là headless fragments.
- Fragment sử dụng phương thức getActivity() để lấy ra Activity cha
- Fragment được định nghĩa trong file xml của activity (static definition) hoặc có thể sửa đổi fragment khi đang chạy (dynamic definition)
2. Vòng đời vủa một Fragment

onAttach(): hàm này thực hiện tạo tham chiếu từ một fragment đến activity đã khởi tạo nó, và thực hiện một số bước trong quá trình khởi tạo
onCreate(): thực hiện khởi tạo fragment
onCreateView(): thực hiện tạo giao diện(view), trả về view là giao diện file xml tương ứng fragment. ko nên tương tác với activity trong hàm này bởi vì activity chưa được khởi tạo đầy đủ. Không cần thực hiện hàm này với các fragment không có header
onActivityCreated(): thực hiện hoàn thành nốt việc khởi tạo activity và fragment. Trong bước này chúng ta có thể gọi findViewById()
onStart(): thực hiện việc hiển thị fragment lên màn hình
onResume(): fragment chính thức hoạt động hoàn toàn
onPause(): fragment bị tạm dừng hoạt động, nó vẫn có thể được nhìn thấy
onStop(): fragment bị ẩn
onDestroyView(): giao diện(view) của fragment bị hủy. Nếu nó được gọi quay lại, nó sẽ quay trở lại thực hiện hàm onCreateView()
onDestroy(): bị hủy
onDetach(): bị hủy hoàn toàn
3. Static Fragment
Static Fragment là kiểu fragment được khai báo (định nghĩa) trực tiếp trong file activity_main.xml
Ví dụ ta có 2 static fragment là MyFragment1.java(fragment1.xml) và MyFragment2.java(fragment2.xml)
Chú ý: các file giao diện thường để dạng LinearLayout. --> Mình cũng không nhớ tạo sao mình lại ghi như thế này nữa :D. Các bạn thông cảm)
Chú ý: các file giao diện thường để dạng LinearLayout. --> Mình cũng không nhớ tạo sao mình lại ghi như thế này nữa :D. Các bạn thông cảm)
Trong file activity_main.xml khai báo tĩnh
<fragment
    android:id="@+id/listFragment"
    android:layout_weight="1"
    android:layout_width="0dp"
    android:layout_height="match_parent"
    class="com.example.android.fragment3.MyFragment1"
    tools:layout="@layout/fragment1">
</fragment>
Thuộc tính class chỉ đến đường dẫn chứa file java tương ứng, thuộc tính layout_weight chỉ ra rằng fragment này chiếm một không gian bao nhiêu phần trong activity_main.xml
Chú ý: Bắt buộc phải có thuộc tính android:id. Nếu không sẽ gây lỗi.
Hai class MyFragment1.java và MyFragment2.java phải extends Fragment
Và phải ghi đè phương thức onCreateView
Và phải ghi đè phương thức onCreateView
public View onCreateView(LayoutInflater inflater, ViewGroup container, Bundle savedInstanceState) {
    super.onCreateView(inflater, container, savedInstanceState);
    View view = inflater.inflate(R.layout.fragment1, container, false);
    return view;
}
Ví dụ
MainActivity.java
package com.example.haitm.fragmentdemo;

import android.support.v7.app.AppCompatActivity;
import android.os.Bundle;

public class MainActivity extends AppCompatActivity {

    @Override
    protected void onCreate(Bundle savedInstanceState) {
        super.onCreate(savedInstanceState);
        setContentView(R.layout.main_activity);
    }
}
MyFragment1
package com.example.haitm.fragmentdemo;

import android.os.Bundle;
import android.support.annotation.Nullable;
import android.support.v4.app.Fragment;
import android.view.LayoutInflater;
import android.view.View;
import android.view.ViewGroup;

public class MyFragment1 extends Fragment {
    @Nullable
    @Override
    public View onCreateView(LayoutInflater inflater, @Nullable ViewGroup container, @Nullable Bundle savedInstanceState) {
        super.onCreateView(inflater, container, savedInstanceState);
        View view = inflater.inflate(R.layout.fragment1, container, false);
        return view;
    }
}
MyFragment2
package com.example.haitm.fragmentdemo;

import android.os.Bundle;
import android.support.annotation.Nullable;
import android.support.v4.app.Fragment;
import android.view.LayoutInflater;
import android.view.View;
import android.view.ViewGroup;

public class MyFragment2 extends Fragment {
    @Nullable
    @Override
    public View onCreateView(LayoutInflater inflater, @Nullable ViewGroup container, @Nullable Bundle savedInstanceState) {
        super.onCreateView(inflater, container, savedInstanceState);
        View view = inflater.inflate(R.layout.fragment2, container, false);
        return view;
    }
}
fragment1.xml
<?xml version="1.0" encoding="utf-8"?>
<LinearLayout xmlns:android="http://schemas.android.com/apk/res/android"
    android:orientation="vertical" android:layout_width="match_parent"
    android:background="#FF0000"
    android:layout_height="match_parent">
    <TextView
        android:layout_width="wrap_content"
        android:layout_height="wrap_content"
        android:text="fragment 1"
        android:textSize="30dp"
        android:layout_gravity="center"
        />
</LinearLayout>
fragment2.xml
<?xml version="1.0" encoding="utf-8"?>
<LinearLayout xmlns:android="http://schemas.android.com/apk/res/android"
    android:orientation="vertical" android:layout_width="match_parent"
    android:background="#AA0099"
    android:layout_height="match_parent">
    <TextView
        android:layout_width="wrap_content"
        android:layout_height="wrap_content"
        android:text="fragment 2"
        android:textSize="30dp"
        android:layout_gravity="center"
        />
</LinearLayout>
main_activity.xml
<?xml version="1.0" encoding="utf-8"?>
<LinearLayout xmlns:android="http://schemas.android.com/apk/res/android"
    xmlns:tools="http://schemas.android.com/tools"
    android:orientation="horizontal"
    android:layout_width="match_parent"
    android:layout_height="match_parent">

    <fragment
        android:id="@+id/listFragment"
        class="com.example.haitm.fragmentdemo.MyFragment1"
        android:layout_width="0dp"
        android:layout_height="match_parent"
        android:layout_weight="1"
        tools:layout="@layout/fragment1">

    </fragment>

    <fragment
        android:id="@+id/detailFragment"
        class="com.example.haitm.fragmentdemo.MyFragment2"
        android:layout_width="0dp"
        android:layout_height="match_parent"
        android:layout_weight="1"
        tools:layout="@layout/fragment2">

    </fragment>

</LinearLayout>
Kết quả

4. Dynamics Fragment
- Lớp FragmentManager cho phép thêm, xóa, thay thế fragment trong layout của activity. Sử dụng phương thức getFragmentManager() hoặc getSupportFragmentManager() để lấy ra một đối tượng FragmentManager
- Việc sửa đổi phải được thực hiện trong một giao dịch thông qua lớp FragmentTransaction
- Để làm như thế, thông thường, chúng ta định nghĩa một FrameLayout giữ chỗ trong file layout, sau đó dùng FragmentManager để ghi đè một fragment vào FrameLayout giữ chỗ đó
FragmentManager fm = getFragmentManager();

// add
FragmentTransaction ft_add = fm.beginTransaction();
ft_add.add(R.id.your_placehodler,new YourFragment());
ft_add.commit();

// replace
FragmentTransaction ft_rep = fm.beginTransaction();
ft_rep.replace(R.id.your_placehodler, new YourFragment());
ft_rep.commit();

// remove
Fragment fragment = fm.findFragmentById(R.id.your_placehodler);
FragmentTransaction ft_remo = fm.beginTransaction();
ft_remo.remove(fragment);
ft_remo.commit();
Ta có thể sử dụng phương thức addToBackStack() để quay lại fragment trước đó (giống như undo). Ví dụ, trong ví dụ trên ta thêm
ft_rep.addToBackStack(null) vào trước ft_rep.commit(). Hệ thống sẽ đăng kí ft_rep vào trong hàng đợi. Ta kích nút back trên điện thoại, nó sẽ lấy trong hàng đợi ra ft_rep và undo lại (hiển thị lại fragment trước đó)
Thêm: Câu lệnh sau giúp việc chuyển giữa các fragment đẹp mắt hơn
fragmentTransaction1.setTransition(FragmentTransaction.TRANSIT_FRAGMENT_OPEN);Ví dụ:
Giống như ví dụ phần 4 nhưng các bạn sửa lại chút
MainActivity.java
MainActivity.java
package com.example.haitm.fragmentdemo;

import android.os.Bundle;
import android.support.v7.app.AppCompatActivity;
import android.view.View;
import android.widget.Button;

public class MainActivity extends AppCompatActivity {

    Button btn;
    android.support.v4.app.FragmentManager fm;

    @Override
    protected void onCreate(Bundle savedInstanceState) {
        super.onCreate(savedInstanceState);
        setContentView(R.layout.main_activity);

        fm = getSupportFragmentManager();

        btn = (Button) findViewById(R.id.btn_add);
        btn.setOnClickListener(new View.OnClickListener() {
            @Override
            public void onClick(View v) {
                android.support.v4.app.FragmentTransaction ft_add = fm.beginTransaction();
                ft_add.add(R.id.frame_layout, new MyFragment1());
                ft_add.commit();
            }
        });
    }
}
Chú ý: Các bạn chú ý khai báo, import đúng phiên bản. Bên MyFragment1.java mình sử dụng thư viên android:support.v4.app thì bên MainActivity các bạn cũng nên sử dụng đúng thư viện
main_activity.xml
<?xml version="1.0" encoding="utf-8"?>
<LinearLayout xmlns:android="http://schemas.android.com/apk/res/android"
    xmlns:tools="http://schemas.android.com/tools"
    android:orientation="vertical"
    android:layout_width="match_parent"
    android:layout_height="match_parent">

    <FrameLayout
        android:id="@+id/frame_layout"
        android:layout_width="match_parent"
        android:layout_height="300dp">
    </FrameLayout>

    <Button
        android:id="@+id/btn_add"
        android:layout_width="wrap_content"
        android:layout_height="wrap_content"
        android:text="add fragment" />

</LinearLayout>
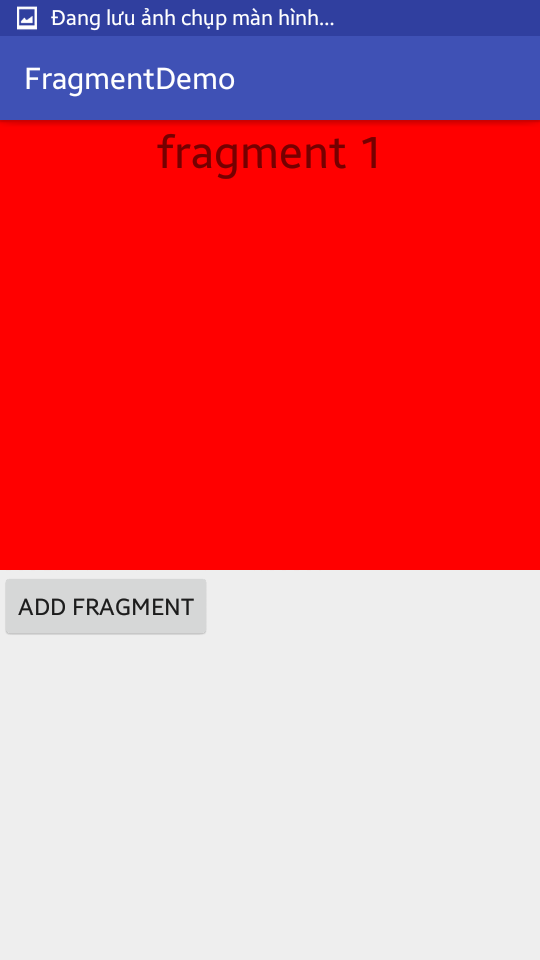
Ví dụ này của mình khi kích button thì Fragment1 được thêm vào.
kết quả:
5. Truyền dữ liệu giữa các Fragment
Để truyền dữ liệu giữa các Fragment, ta sử dụng Bundle. Các bạn xem ví dụ dưới đây.
MyFragment myFragment = new MyFragment();
Bundle bundle = new Bundle();
bundle.putString("url", "https://xuxu_minhanh");
myFragment.setArguments(bundle);
Trong file MyFagment.java, trong hàm onActivityCreated()
@Override
    public void onActivityCreated(Bundle savedInstanceState) {
        super.onActivityCreated(savedInstanceState);
        Bundle bundle = getArguments();
        if (bundle != null) {
            String link = bundle.getString("url");
            setText(link);
        }
    }
link github ví dụ: https://github.com/haitm11/FragmentDemo
Tham khảo: http://www.vogella.com/tutorials/AndroidFragments/article.html
Tham khảo: http://www.vogella.com/tutorials/AndroidFragments/article.html
Nhận xét
Đăng nhận xét